Cabinet Cleaning: The Powerful Guide to a Grease-Free Kitchen
Cabinets take more daily wear than most people realize. Hands touch them all day. Steam rises from cooking. Grease floats in the air. Then dust sticks to it. Over time, even a “clean” kitchen can look dull because the cabinet surfaces quietly collect buildup.
The good news is that Cabinet Cleaning does not have to feel like a big project. With the right steps, you can get better shine, remove sticky film, and protect the finish. Even better, once you set a simple routine, keeping cabinets clean becomes quick and easy.
Why Cabinet Cleaning Matters in a Busy Home
Cabinets sit at eye level. So, you notice them. When they look grimy, the whole kitchen feels off. Also, buildup can shorten the life of the finish. That means more wear, more discoloration, and more costly repairs later.
Cabinet Cleaning is also a hygiene step. Kitchen grime can include food residue, oils, and bacteria from hands. So, regular cleaning helps your home feel fresher and more cared for.
Common Cabinet Problems That Need Attention
- Sticky film near the stove
- Dust and grease buildup on upper cabinets
- Drips and crumbs inside drawers
- Fingerprints around handles
- Dark spots near knobs and corners
If you see any of these, you are not alone. Most kitchens in active homes need a reset every so often.
Cabinet Cleaning Basics: What You Need Before You Start
You do not need a closet full of products. In fact, too many harsh cleaners can damage cabinet finishes. Instead, keep it simple and safe.
Here’s what helps most:
- Warm water
- Mild dish soap
- Microfiber cloths
- A soft toothbrush or small detail brush
- A dry towel for buffing
Optional but helpful:
- A gentle degreaser for heavy kitchen grease
- A wood-safe cleaner for natural wood cabinets
Always test your product on a small hidden area first. That way, you protect the finish.
Detailed Cleaning vs. Quick Wiping Down
Both matter. The key is knowing when to do each.
- Wiping down is your maintenance step. It’s quick. It prevents buildup.
- Detailed cleaning is your reset step. It targets sticky spots, edges, and areas you usually miss.
A smart plan uses both. So, you save time and keep cabinets looking consistently clean.
Step-by-Step Cabinet Cleaning Guide
Step 1: Empty the small zones first
You do not need to empty every cabinet at once. Start with the areas that get the dirtiest, like the cabinets near the stove or the snack drawer.
If you do a little at a time, Cabinet Cleaning becomes easier to maintain.
Step 2: Dust before you use water
Dust turns into mud when it gets wet. So, start dry.
Wipe the cabinet fronts with a dry microfiber cloth. For upper cabinets, especially above the fridge, remove loose dust first.
Step 3: Mix a gentle cleaning solution
In a bowl or spray bottle, mix warm water with a small amount of mild dish soap. This is often enough for standard cabinet grime.
Use a damp cloth, not a soaking wet cloth. Too much water can damage wood and weaken finishes over time.
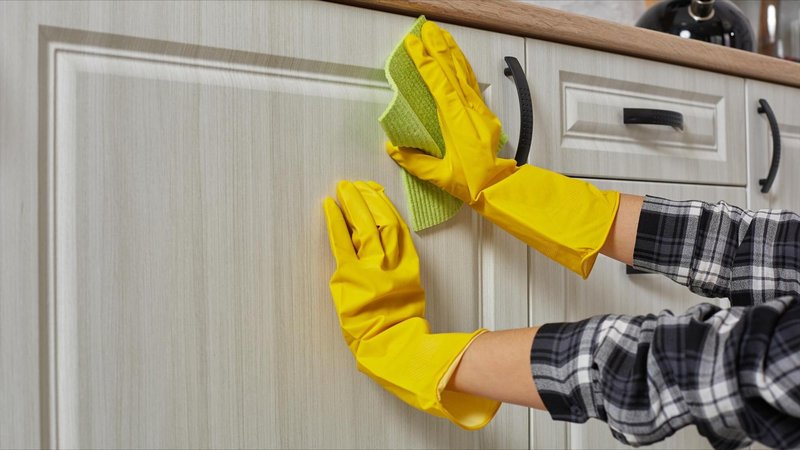
Step 4: Wiping down cabinet doors the right way
Work top to bottom. Move in small sections. Then dry as you go. This prevents streaks and water spots.
Focus on the areas that get touched most:
- Around handles
- Lower cabinet edges
- Corners where grease collects
This simple wiping down step can make cabinets look noticeably cleaner in minutes.
Step 5: Remove grease buildup near the stove
If soap and water are not enough, use a gentle degreaser or a wood-safe cleaner. Apply it to the cloth first, not directly on the cabinet. That helps you control the product and protect the finish.
Let it sit for 30 to 60 seconds on sticky areas. Then wipe again with a clean damp cloth. Finally, dry and buff.
Step 6: Detailed cleaning in edges, grooves, and trim
This is where the difference shows. Use a soft toothbrush for creases and decorative trim. This helps you remove grime without scratching.
This is also the step that makes your kitchen look “professionally cleaned.”
Step 7: Clean cabinet interiors without overdoing it
Cabinet interiors don’t always need weekly cleaning. Still, spills and crumbs should be handled quickly.
For interior cleaning:
- Remove loose crumbs with a dry cloth or handheld vacuum
- Wipe with mild soapy water
- Dry completely before putting items back
If you store oils or sauces, line the shelf with a washable liner. It saves time later.
Step 8: Don’t forget the handles and knobs
Cabinet hardware is a high-touch surface. So, it needs regular cleaning.
Use a damp cloth with soap and water. Then dry it well. If you see sticky residue, wipe again with a clean cloth.
Step 9: Buff for a clean, finished look
After Cabinet Cleaning, buff the surfaces with a dry microfiber cloth. This removes haze and gives a smoother shine. It also helps reduce streaks, especially on painted cabinets.
Cabinet Cleaning by Material: What to Do and What to Avoid
Different cabinet finishes react differently. If you are unsure, choose the gentlest method.
Painted cabinets
Painted cabinets scratch easier. So, avoid abrasive pads. Use soft cloths only, and dry quickly.
Avoid:
- Strong scrub sponges
- Harsh bleach products
- Soaking water around seams
Wood cabinets
Wood needs less water and more care. Use a wood-safe cleaner when possible. Also, dry immediately.
Avoid:
- Vinegar heavy mixes (they can dull some finishes)
- Excess moisture left on the surface
Laminate cabinets
Laminate is durable, but seams can swell if water sits too long. So, keep cloths damp, not wet, and dry after wiping.
How Often Should You Do Cabinet Cleaning?
Your schedule depends on your lifestyle. Still, these guidelines work well for most homes.
- Weekly: quick wiping down of door fronts and handles
- Monthly: focus on sticky zones near the stove
- Every 3–6 months: detailed cleaning of edges and interiors
If you have pets or kids, you may need more frequent wiping down. However, small routines prevent big projects later.
Cabinet Cleaning Tips That Save Time
If you want faster results, use smart habits. These small steps reduce grime buildup.
Try this:
- Turn on the vent fan while cooking
- Wipe splatters right after cooking, once surfaces cool
- Keep a microfiber cloth under the sink for quick wipe-downs
- Use a gentle routine cleaner instead of switching products constantly
Also, set a timer for 10 minutes. When you keep it short, you are more likely to do it.
When to Hire a Professional for Detailed Cleaning
Sometimes, you want a deeper reset without spending your weekend scrubbing. Professional cleaning can help, especially if you are moving, hosting, or catching up after a busy season.
A professional team can:
- Remove heavier grease safely
- Handle detailed cleaning in hard-to-reach areas
- Pair cabinet work with deep cleaning services
- Save you time while delivering consistent results
For busy homeowners and renters in Greenville, that convenience can be the best benefit.
The Fresh Kitchen Finish
Cabinets shape how your kitchen feels every day. When they look clean, the whole room looks brighter and more put together. And when you maintain them with simple wipe-downs, you avoid stubborn grease later.
If you want a kitchen that feels truly refreshed, make Cabinet Cleaning part of your routine. Start small, stay consistent, and schedule detailed cleaning when you need a bigger reset. Your cabinets will look better, last longer, and feel cleaner every time you open the door.
● Meta Description (140 caracteres): Cabinet Cleaning made simple. Learn wiping down steps, detailed cleaning tips, and safe methods for a grease-free kitchen. 15. Ironing Service: Stop Fighting Wrinkles